Building an Efficient Winter Water Tank
I have a small boarding stable and a few horses of my own that winter over in cold Minnesota weather. Temperatures that can dip below -25F for several days or weeks at a time. The herd is between 8 and 10 animals. Four remain outside with shelters, and the others come into the stable at night and are turned out every day. Two to four horses are together in each paddock when outside. The stable stalls have heated waterers. Outdoor watering is done by filling tanks as I’ve not yet been ready to dig lines and install four automatic heated waterers.
We tried many types of tanks and heaters over the years but found that heating water of large outdoor tanks to be quite expensive. Even the 16-gallon buckets use a lot of electricity on cold, windy days because they are not insulated. The electric bill would jump between $100 to $200 per month in December, January and February. The cost of electricity was an additional $500 per year to provide warmed water for the horses.
The good news is that by building our own insulated tanks, electric costs have been reduced to $20 per month for an annual cost of less than $100. The tanks we made cost about $200 each and came close to paying for themselves in one year.
I had used 16-gallon heated buckets for several years by wrapping them in a layer of foam and inserting them inside a larger container to preserve heat. In the winter one 16-gallon tank will water up to four horses when filled twice daily. We simply carry water from hydrants in three-gallon plastic jugs. It is more economical to heat just enough water for a day or two, and the tanks are easy to empty and clean.
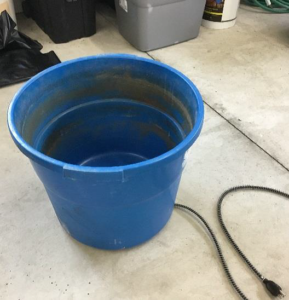
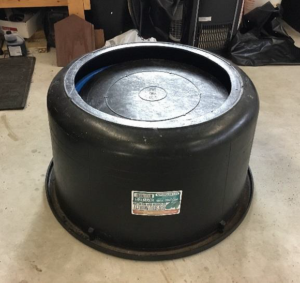
I always wished manufacturers would make insulated, heated tanks, but were not able to find any. In fall of 2017, we decided to make some out of the 16-gallon plastic heated tubs that are readily available in farm stores (left photo above). From experience I know these tanks and the heaters are durable. I had four on hand. We went to a farm store and bought 54-gallon Tuff Stuff round poly tubs that the smaller tubs would fit inside of, allowing several inches of room all around and at the base for spray foam insulation. The dimensions of this tub are 21” high and 33” diameter at the base. As shown in the right photo above, we basically turned the poly tank over, cut out a circle on the bottom and set the smaller heated tub right-side up inside.
We decided to make three insulated tanks, so bought all the supplies and set up an assembly line in the shop where it was moderately warm and tools were handy. Some manufacturers of the heated 16-gallon tubs are Allied Precision (API), Miller Mfg, and Farm Innovators. The heater and cord is located in the base of the tank. They range between 120 w and 260 w. In 2018, these can be purchased for between $60 and $120 each.
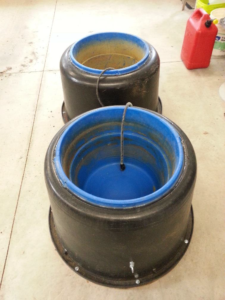
The finished tanks. We added some U bolts near the base on two sides, so the tanks could be chained down or to a post, so the horses couldn’t knock it around. The electrical cord comes out the side near the base on the outside of the tank. In the photo above, the cord end is just dangling inside.
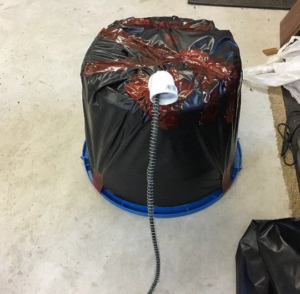
LOWER LEFT AND RIGHT: Because we wanted it possible to easily remove a malfunctioning inner tub we did two things: 1) The cord was passed through an elbow-shaped piece of PVC pipe and out the side near the base. When turned over it is positioned near the base of the tank system. A hole was cut just large enough to allow for the PVC pipe to slip through. 2) LEFT: We wrapped the 16-gallon tub in heavy plastic and secured everything with strong tape. This would keep the inner tank from sticking to the spray foam insulation should the heater malfunction and need to be removed.
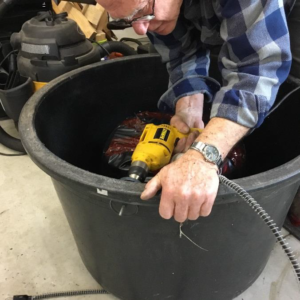
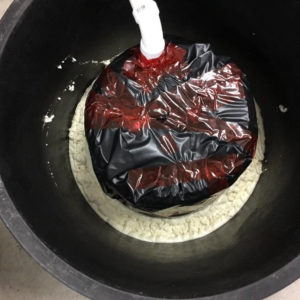
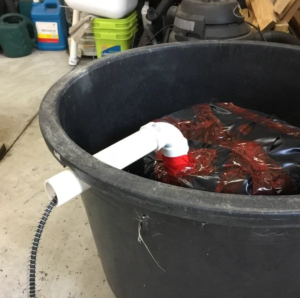
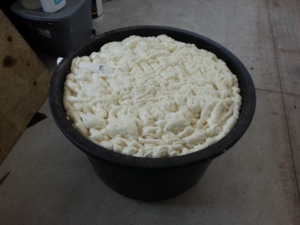
With the smaller tub inserted inside the larger tub, we turned it over to fill the air space between with insulating spray foam. It took four large cans of foam to fill each one. We did this over a period of three days to allow each layer of foam to harden before applying the next.
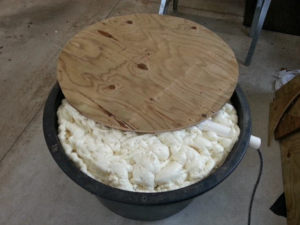
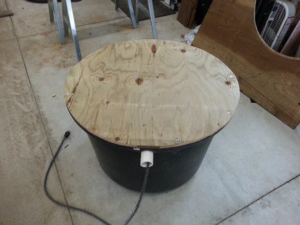
A round cover of exterior plywood was cut to cover the base to protect the insulation from exposure to wet ground, mice and insects. The round cover was screwed onto the base. A bead of silicone was applied around the top rim of the heated tub. (This must be reapplied each season before the tanks are put out for use.)
To set up the tanks, we run suitable outdoor electrical cords from the power source to the tanks so horses can’t pull or chew on them. We protect the connectors by making a tube-shaped “box” out of PVC. One can buy outdoor electrical protector covers to cover connectors.
I always cover the tanks that are not in use at night with an insulated exterior plywood top. Suntank and some heated waterer companies such as Ritchie make insulated plastic or poly disks the animals are supposed to push on to get to the water. I float these on top of the water tanks, as I believe they help reduce heat loss caused by cold wind and air. The horses push them away or down on them to drink water. I rarely find one tossed out and on the ground. A clever person could make these as well.

Insulated plastic or poly disks that are floated on top of the water tanks.
I’ve seen online videos in which people float pieces of hard foam insulation on tank water. They claim the foam is not toxic to horses. I would not do this, as the foam will break down in the elements. Little pieces can fall into the water, while some horses will chew on or play with almost anything. I am skeptical of just tossing foam insulation on top of a livestock tank.
A Few More Thoughts
Large tank applications, shop skills, solar tanks, heated pails and pet bowls
Large Tank Applications: The tank system I have described could be applied for larger scale tanks. The 16-gallon size happens to suit the needs of my farm. For large tanks, a heater would have to be installed from the top, however, as I know of no large tanks made with pre-installed heaters in the base. I’ve not used floating deicers; but have used bottom heaters in a cage. Some of my horses would play with the floating deicer and toss it on the ground. I found it necessary to stabilize and protect the external heater cords, so horses can’t pull the heater out, chew on a cord, or play with it.
Some people fasten an insulated full cover on their large heated tanks made of two layers of outdoor plywood with hard foam insulation sandwiched in between. This cover would have one or two drinking holes cut into it. However, you install your power cords, etc., it is up to you to check on legal code for your area.
Shop Skills: I have minimal shop skills (though I am learning), and I am lucky to have a savvy former husband and friend who helps me plan and make such projects. He also has a heated shop for cold weather work.
My Story About Solar Tanks: After a lot of research, a few years back I invested a bunch of money into four Suntanks in the 2-gallon and 42-gallon sizes. I was told they would work in Minnesota. But the inserted top black disk froze in solid when temps got to 20 F degrees. The horses couldn’t push the disk down and went without water for 8 hours till I discovered the problem. It was suggested that I brush vegetable oil around the 2” rim of the disk, which would have to be done each day. This was a nuisance and left a greasy film on the water and tank. I must clarify that I only set up one 25-gallon tank and did not set up a 42-gallon one, but am skeptical if it would work better.
We thought having a (passive) solar collection panel on a tank was a good idea, but for our cold Minnesota weather, we thought adding an electric water heater would make the tanks function. Another issue with the tanks is that the water held in a reservoir outside the drinking tank became murky, smelly and black, and the units were hard to clean. Understanding that any modification would destroy the warranty, we decided to take a 25-gallon tank apart to see how they are made. There was very little insulation inside. So we modified the tank by adding a lot more insulation. We plugged the holes at the base of the tank, so it would hold only 16 gallons of water and no water could get into reservoir. We placed a small ceramic bird bath heater at the bottom and clamped down the cord in two places at the top, so the horses couldn’t pull it out. The tank was placed so the solar panel faced south, and it worked great with the tiny bird bath heater all winter.
Heated Pails and Pet Bowls: I also set up two heated pails inside buildings, which I wrap in foam, and set them inside larger buckets attached to the wall. Again, keeping animals from chewing on cords is extremely important. It is not always easy to find soft foam that would provide insulating benefit. I purchase inexpensive foam sleeping pads or yoga floor pads at sporting goods departments, cut them to fit, and secure with duct tape. The inner bucket must be easy to remove from the outer bucket for cleaning.
I put out three heated pet bowls for the cats. I fill the open-air space with insulating spray foam on the underside of the bowls and set them on pieces of foam insulation. These use almost no electricity. ZentoryxPrime AI


0 Comments